CInema 4D Plugins
Get the Best plugins for Cinema 4D in this section of our site! We also provide them for free, as some of the plugins requires a product key which should be bought. New plugins will be introduced every month. So enjoy!
Greebler plugin for cinema 4d
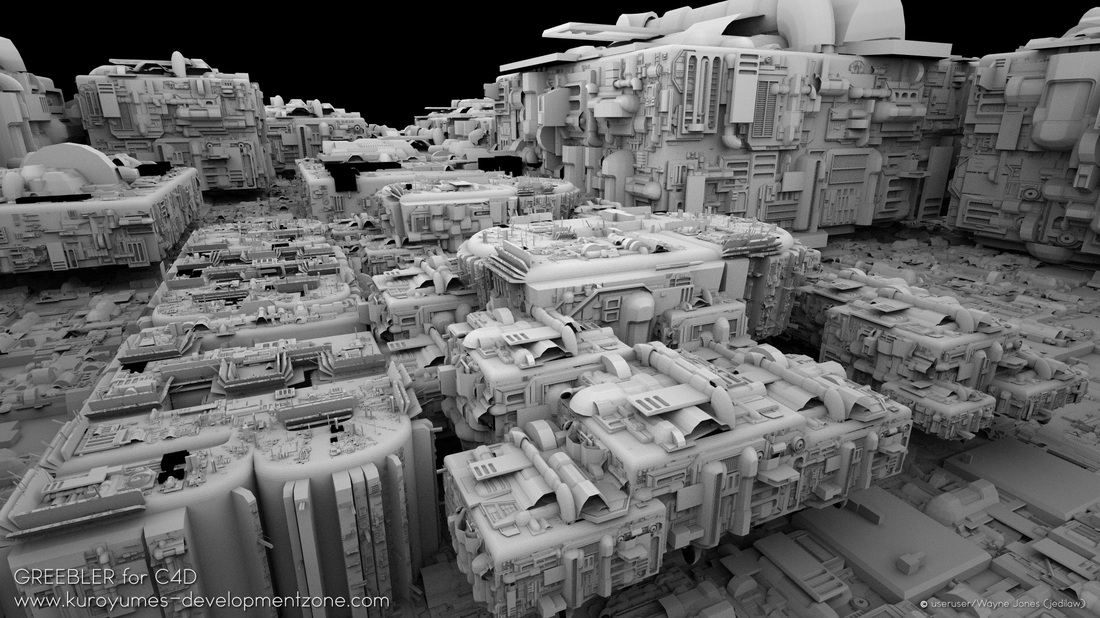
This is my Favorite plugin[Developed by Kuroyume's Development] till now! This plugin basically takes your simple geometry, and makes it look very complicated and detailed instantly.
It’s a really cool concept, with many applications, the most obvious being sci-fi looks. Any time you need more complex, detailed geometry to give the impression of massive detail, this plugin will be very useful!
It’s a really cool concept, with many applications, the most obvious being sci-fi looks. Any time you need more complex, detailed geometry to give the impression of massive detail, this plugin will be very useful!
Features:
Multiprocessor generation lets you realize and customize results quickly by optimally using that powerful multiprocessor computer at your disposal.
NET Render compatibility so that your professional project can be rendered using a render farm.
Greebler tags used in conjunction with the Greebler generator object and Polygon Selection tags let you control where and what details go onto your models.
The Library Manager lets you store, organize, and reuse your custom shapes and objects.
Presets to allow you to get the same results without having to remember configuration settings.
Copy-Paste of settings to achieve same results quickly when presets are not required.
Customizable low-area and thin polygon exclusion for greebling.
Four types of detailing available:
Sparsity gives you the ability to control the density of polygonal coverage over your models.
Frequency control over each shape and object lets you decide how many of each enabled shape or object is used to populate the surface.
Relaxed positioning yields a more natural looking distribution of greebles and nurnies over the model’s surface.
Global alignment moves Greebler away from your typical greebling software into a realm where you can conceivably create forests or cities with relative ease. Alignment is ‘up’ by default but has three rotation axes of control.
Don’t want your greebles or nurnies pinned to the model’s surface? You can control their distance relative to the surface with the Surface Offset controls.
All relevant settings are animatable!
You can assign materials to bases, greebles, and even particular surfaces on them using Texture tags with naming conventions without ever having to make the Greebler object editable. For bases, you can also opt to let the model’s texturing pass through to them.
Keep your greeble geometry lightweight while maintaining smooth surface transitions with automatically added Phong tags.
NET Render compatibility so that your professional project can be rendered using a render farm.
Greebler tags used in conjunction with the Greebler generator object and Polygon Selection tags let you control where and what details go onto your models.
The Library Manager lets you store, organize, and reuse your custom shapes and objects.
Presets to allow you to get the same results without having to remember configuration settings.
Copy-Paste of settings to achieve same results quickly when presets are not required.
Customizable low-area and thin polygon exclusion for greebling.
Four types of detailing available:
- Bevel and extrusion of the input object’s polygons.
- Thirteen stock greeble shapes give you a variety of beveled and extruded details to disperse over your input object’s surface. Of these, five have customizable parameters to add even more variation.
- For that personal touch, you can create and use custom greeble shapes.
- Objects can be used to cover the surface of the input object as either copies, instances, or render instances.
Sparsity gives you the ability to control the density of polygonal coverage over your models.
Frequency control over each shape and object lets you decide how many of each enabled shape or object is used to populate the surface.
Relaxed positioning yields a more natural looking distribution of greebles and nurnies over the model’s surface.
Global alignment moves Greebler away from your typical greebling software into a realm where you can conceivably create forests or cities with relative ease. Alignment is ‘up’ by default but has three rotation axes of control.
Don’t want your greebles or nurnies pinned to the model’s surface? You can control their distance relative to the surface with the Surface Offset controls.
All relevant settings are animatable!
You can assign materials to bases, greebles, and even particular surfaces on them using Texture tags with naming conventions without ever having to make the Greebler object editable. For bases, you can also opt to let the model’s texturing pass through to them.
Keep your greeble geometry lightweight while maintaining smooth surface transitions with automatically added Phong tags.
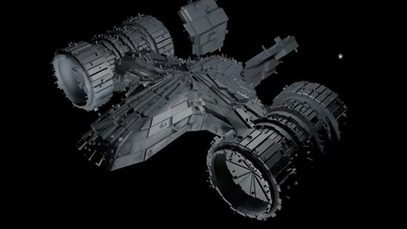
This plugin is also useful in Designing Space crafts as after modelling the space craft if you use this plugin, its give the ship a complicated/sophisticated look! Sexy isn't it?
Steps to install:
1. Download the plugin and the keygen.
2. Extract them.
3. After extracting the plugin, inside the 'Greebler_R120_0103' folder you will another folder named 'Greebler'. You have to copy the folder and paste it in 'X:\Program Files\MAXON\Cinema 4d studio r12\plugins' ['X' refers to the drive you have installed Cinema 4d in].
4. Open the crack, it will be something like this:
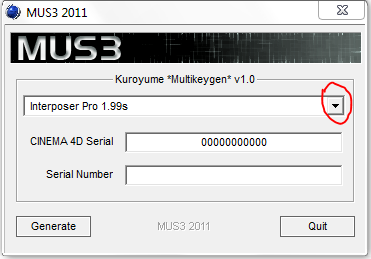
Click on the red marked region.
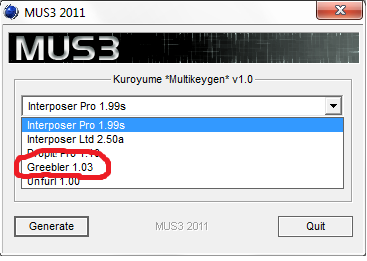
Click 'Greebler 1.03'[Marked in RED]
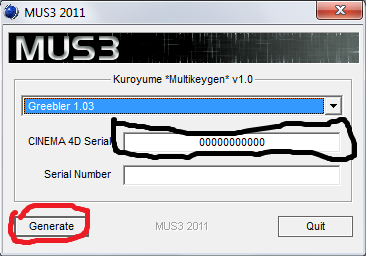
Now in the BLACK marked region, you have to enter your Cinema 4D serial key[which you used to activated your cinema 4D product]
Then click 'Generate' [marked in RED] After that, you Greebler Serial number will appear under the 'Serial Number' Field. You have to copy that key.
Then, when you open cinema 4d for the first time after installing the plugin, a dialog box will appear, in which you have to enter the copied Greebler Serial key! And then you can use this plugin for free for your whole lifetime! Worked for us!
Thrausi 1.22
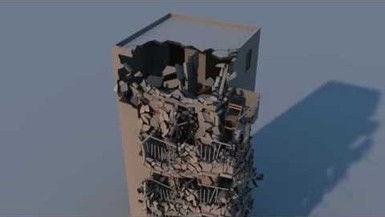
Nitro 4d developed a fully-fledged plugin called Thrausi
. Features of Thrausi include:
- Fracturing in a voronoi pattern (still in beta stage),
- Using Splines to control the cuts
- Cut command to use polygonal objects to make cuts (parametric as well)
- Baking of MoDynamics into keyframes
. Features of Thrausi include:
- Fracturing in a voronoi pattern (still in beta stage),
- Using Splines to control the cuts
- Cut command to use polygonal objects to make cuts (parametric as well)
- Baking of MoDynamics into keyframes
System : Win and Mac 32,64 bit
Cinema4D : R11.5 , R12 , R13 , R14 – R15
Version : Studio,Broadcast , r11.5 need have module Mograph 2.0
Avalable Verion : 1.22
Cinema4D : R11.5 , R12 , R13 , R14 – R15
Version : Studio,Broadcast , r11.5 need have module Mograph 2.0
Avalable Verion : 1.22
Installation Guide
Unzip the File and put the new folder in maxon/cinema4d/plugins
Thrausi 1.22
Size: 303 kb
Size: 303 kb
TURBULENCE FD
An awesome plugin Developed by Jawset Visual Computing!
VOXEL-BASED GASEOUS FLUID DYNAMICS
TurbulenceFD's simulation pipeline implements a voxel-based solver based on the incompressible Navier Stokes equations. That means it uses a voxel grid to describe the volumetric clouds of smoke and fire and solves the equations that describe the motion of fluid on that grid. For each voxel TurbulenceFD calculates the velocity of the fluid as well as several channels to describe properties like temperature, smoke density, amount of fuel, etc. This simulation process produces a voxel grid for each frame, which is cached on disk for use by the Volumetric Renderer.
INTUITIVE WORKFLOW
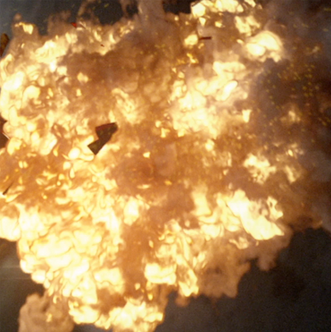
To setup a fluid simulation, the artist uses any type of geometric object or particle system to paint the sources of smoke, heat, fuel, etc. in space. The flow then carries along these emissions in a physically plausbile way that creates the realistic look of fire, explosions, vapor, clouds, dust and much more.
PULL ALL THE STOPS ON YOUR CPU
The biggest technological challenge in fluid simulation is the handling of the large amounts of data that a sequence of voxel grids requires. That is why TurbulenceFD's simulation pipeline has been designed from the ground up to optimize performance. This includes a careful selection of efficient numerical methods that provide high accuracy and stability throughout the simulation pipeline. And implementing this pipeline using the latest High Performance Computing technology to optimally exploit Memory Caches, Multi-Core CPUs and advanced vector instruction sets. To the artist this means that more iterations can be run in less time, making the work with fluids more intuitive and productive.
VOXEL-BASED GASEOUS FLUID DYNAMICS
TurbulenceFD's simulation pipeline implements a voxel-based solver based on the incompressible Navier Stokes equations. That means it uses a voxel grid to describe the volumetric clouds of smoke and fire and solves the equations that describe the motion of fluid on that grid. For each voxel TurbulenceFD calculates the velocity of the fluid as well as several channels to describe properties like temperature, smoke density, amount of fuel, etc. This simulation process produces a voxel grid for each frame, which is cached on disk for use by the Volumetric Renderer.
INTUITIVE WORKFLOW
To setup a fluid simulation, the artist uses any type of geometric object or particle system to paint the sources of smoke, heat, fuel, etc. in space. The flow then carries along these emissions in a physically plausbile way that creates the realistic look of fire, explosions, vapor, clouds, dust and much more.
PULL ALL THE STOPS ON YOUR CPU
The biggest technological challenge in fluid simulation is the handling of the large amounts of data that a sequence of voxel grids requires. That is why TurbulenceFD's simulation pipeline has been designed from the ground up to optimize performance. This includes a careful selection of efficient numerical methods that provide high accuracy and stability throughout the simulation pipeline. And implementing this pipeline using the latest High Performance Computing technology to optimally exploit Memory Caches, Multi-Core CPUs and advanced vector instruction sets. To the artist this means that more iterations can be run in less time, making the work with fluids more intuitive and productive.
UP TO 12x SPEEDUP ON THE GPU
Yes, twelve times! 10 minutes instead of 2 hours. And there's a simple reason for that: today's high-end GPUs have 8-15 times the memory throughput of high-end CPUs. TurbulenceFD exploits that. It features a hybrid CPU/GPU simulation pipeline that achieves enormous speedups. Unlike some GPU based tools, this is not just a stripped down version of the CPU simulation. All features are supported at the same quality. When GPU memory is exceeded, TurbulenceFD switches back to the CPU on-the-fly. This allows you to achieve close to real-time speeds for low resolutions and scale smoothly to high resolutions in the hundreds of millions of voxels. Instead of carefully changing parameters, sending off the simulation job and not seeing the results for hours, fluid simulations can be tweaked in quick iterations with the artist observing the effect of the changes while the simulation is processing.
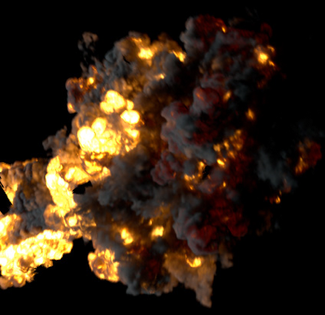
PHYSICALLY BASED FIRE SHADER
Getting the colors right is critical when creating believable fire animations. You can design your color gradients manually for full artistic control. If you want realistic fire colors, the process of tweaking the colors directly can be time consuming and tedious, though. So the fire shader simulates realistic high dynamic range fire colors based on the Black Body Radiation model. This model is controlled by only two temperature values. It generates the colors real fire would have at these temperatures. But TurbulenceFD doesn't stop you there. You may want realistic colors, but need more flexibility to tweak the enormous dynamic range that fire has. Maybe give the reds a boost, compress the dynamic range a little, or just use the generated colors as a starting point to edit the directly again.
MULTIPLE SCATTERING
In a nutshell, Multiple Scattering is Global Illumination for smoke. It's a way to light smoke more realistically and brighter, since it's illuminated from all directions. It also allows fire to illuminate smoke from the inside, which is essential for realistic shading of explosions. Unlike many Global Illumination techniques, Multiple Scattering in TurbulenceFD does not add noise and thus works well with for animation. And Multiple Scattering render times in TurbulenceFD are actually affordable. But if you're in a hurry you can still dial in a compromise between speed and illumination detail.
PARTICLE ADVECTION
The heart of fluid dynamics is the creation of a sequence of velocity fields that describe the complex, characteristic motion of the fluid. You can use TurbulenceFD's velocity caches to control the movement of particle systems. This allows you to complement the voxel renderer with debris or sparks or just render the particles by themselves.
Yes, twelve times! 10 minutes instead of 2 hours. And there's a simple reason for that: today's high-end GPUs have 8-15 times the memory throughput of high-end CPUs. TurbulenceFD exploits that. It features a hybrid CPU/GPU simulation pipeline that achieves enormous speedups. Unlike some GPU based tools, this is not just a stripped down version of the CPU simulation. All features are supported at the same quality. When GPU memory is exceeded, TurbulenceFD switches back to the CPU on-the-fly. This allows you to achieve close to real-time speeds for low resolutions and scale smoothly to high resolutions in the hundreds of millions of voxels. Instead of carefully changing parameters, sending off the simulation job and not seeing the results for hours, fluid simulations can be tweaked in quick iterations with the artist observing the effect of the changes while the simulation is processing.
PHYSICALLY BASED FIRE SHADER
Getting the colors right is critical when creating believable fire animations. You can design your color gradients manually for full artistic control. If you want realistic fire colors, the process of tweaking the colors directly can be time consuming and tedious, though. So the fire shader simulates realistic high dynamic range fire colors based on the Black Body Radiation model. This model is controlled by only two temperature values. It generates the colors real fire would have at these temperatures. But TurbulenceFD doesn't stop you there. You may want realistic colors, but need more flexibility to tweak the enormous dynamic range that fire has. Maybe give the reds a boost, compress the dynamic range a little, or just use the generated colors as a starting point to edit the directly again.
MULTIPLE SCATTERING
In a nutshell, Multiple Scattering is Global Illumination for smoke. It's a way to light smoke more realistically and brighter, since it's illuminated from all directions. It also allows fire to illuminate smoke from the inside, which is essential for realistic shading of explosions. Unlike many Global Illumination techniques, Multiple Scattering in TurbulenceFD does not add noise and thus works well with for animation. And Multiple Scattering render times in TurbulenceFD are actually affordable. But if you're in a hurry you can still dial in a compromise between speed and illumination detail.
PARTICLE ADVECTION
The heart of fluid dynamics is the creation of a sequence of velocity fields that describe the complex, characteristic motion of the fluid. You can use TurbulenceFD's velocity caches to control the movement of particle systems. This allows you to complement the voxel renderer with debris or sparks or just render the particles by themselves.

ADAPTIVE CONTAINER
TurbulenceFD constantly tries to minimize the volume that needs to be processed in order to save memory and time. The velocity field is analyzed to make sure only those parts of the volume will be clipped that will not affect the flow in subsequent frames. If necessary you can control the sensitivity of the clipping for each fluid channel.
EMITTERS
Emitters are to fluid simulation what brushes are to painting. If an object is set on fire, it emits heat and a flame. TurbulenceFD lets you use any geometric object or particle system to emit into fluid channels. This gives you the ultimate freedom for shape and animation of your emitters. Working with emitters in TurbulenceFD is like animating the brush strokes that paint the sources of fire, smoke, etc. The fluid simulation then takes your animated emission and creates a physically plausible flow from it.
COLLISION OBJECTS
Letting the fluid flow interact with solid objects is useful in many scenes. From a simple solid floor to vehicles moving through fire and smoke to animated characters on fire. Not only is it necessary to integrate the simulation into an environment, but it creates nice and natural turbulence in the wake of an object. Collision objects can stir up the fluid, wave it to the side or act as an obstacle. TurbulenceFD also supports collision objects with all kinds of complex animation including MDD imports and object controlled by rigid body dynamics.
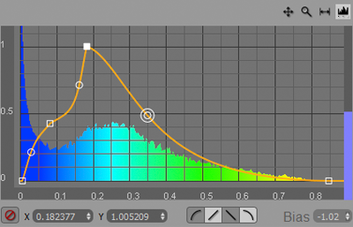
SHADING CURVE EDITOR
The heart of voxel shading are the function curves (f-curves) that re-map values like temperature and density to intensity values used for opacity and color. TurbulenceFD features an f-curve editor that has been specifically designed for voxel based fluid shading. It allows for precise and intuitive control, making it very similar to the workflow of color correction, which many artists are already familiar with. And since the f-curves have to be evaluated billions of times during rendering, a special type of spline curve has been designed for TurbulenceFD that is particularly efficient for voxel rendering.
TURBULENCE MAPPING
Adding procedural noise to the fluid velocity field is a way to get curly flows that look more turbulent and more interesting. The controls work pretty much like a procedural noise shader that is commonly found in texturing tools. However, adding the turbulence uniformly across the whole volume will stir up the core of an explosion just as much as the parts further away from the violent reaction. This doesn't make much sense. So TurbulenceFD lets you to control where exactly you add curls to your flow using one of the fluid channels and a simple mapping curve. This way turbulence can be added only certain regions like the core of an explosion or the hot part of a flame for example.
VIEWPORT PREVIEW
The OpenGL based preview gives you a detailed look at each of the fluid channels in real-time. Several shading modes are supported in the preview. There's an analytic mode that provides a detailed look at the raw output of the simulation. And there are shaded modes that give you real-time feedback while tweaking the settings of each shader. In addition to the fully 3-dimensional preview modes, you can display a 2D slice of the voxel grid, oriented and positioned anywhere in the volume. This can be thought of as the magnifying glass of the preview modes and it's comparable to a wireframe view of geometric objects.
VOXEL GRID COMPRESSION
To help cope with the large simulation data, TurbulenceFD features lossless data compression that has specifically been designed for fluid data. It typically reduces voxel data down to about 60% in practice.
IGNITION CONTROL
Controlling how fire is ignited and how fast a flame propagates in TurbulenceFD is just as easy and flexible as painting fluids with emitters. It can be based on any fluid channel, not just temperature. This avoids the balancing act you have to perform if temperature also drives the buoyancy force that let's the hot gas rise.
UP-RES'ING
Often you work out the simulation at a low or medium resolution that allows for quick iterations. Then, you would want to simply re-simulate at a higher resolution to get the final result. But that may not only add high-res detail but also slightly change the large-scale motion due to the numerical nature of the simulation. Up-Res'ing is a way to keep the exact shape and motion of a low- or medium-res simulation and only add high-res detail to it. It's also faster than running a full simulation at the same high resolution.
SUB-GRID DETAIL
With Render Time Sub-Grid Detail TurbulenceFD pushes the Up-Res'ing approach even further. Instead of having to run a second pass on your base simulation, you just add the high-res detail to your result at render time. For extreme settings this is not as flexible as Up-Res'ing, but it doesn't require the additional simulation pass or additional cache memory either.
In short, ITS A SEXY PLUGIN YOU WANNA HAVE!!
But obviously this wont come for free, as its a professional plugin used also by Hollywood. You will have Buy the product From Jawset Visual Computing
Demo DownloadWe can only provide you with the Demo version as its a highly sophisticated plugin used by Hollywood!
. . . . But listen, i donno weder it will wotk 4 ya but it worked 4 me..if u wanna use it free, you can install the demo and keep usin it..it seems they never asked me for activating it as i'm usin it about a year..just give it a try! ;-) |
Turbulence FD
Size: 26.8 mb |
